
The most awaited feature is here! — Microsoft Teams Virtual Breakout Rooms.
Here is a guide for both Admins and Users + my take on the virtual breakout rooms.
Do read to the end for extra notes/anecdotes/tips/workarounds/warnings (hidden in between the steps).
Just announced: There’s no need to enable public preview for this feature. It is generally available!
You can begin at Step 5 & skip to Step 11.
For you, who are admins in your Microsoft Office 365 tenants:
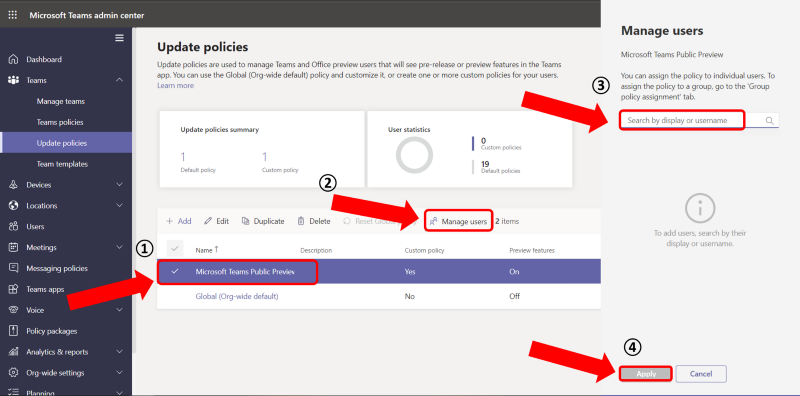
Step 1: Go to https://admin.teams.microsoft.com/ → Sign in.
Step 2: Click Teams → Update policies.

Step 3: + Add → Name your new policy → [Optional] Give a description → Toggle On for Show preview features → Apply.

Tip: Why create a new policy?
This is to make sure you can still revert to the original policy [Global (Org-wide default] if anything goes haywire.
If you still wish to configure the original policy, then do it at your own risk.
Step 4: Click the newly created policy → Manage Users → Type in the users who wants to try it (or needs it) → Apply.
Step 5: Wait for ± 2 hours for it to take effect.
For you, users who will be using the Teams breakout rooms:
Step 1: Wait for your IT admin to let you know if it has been enabled.
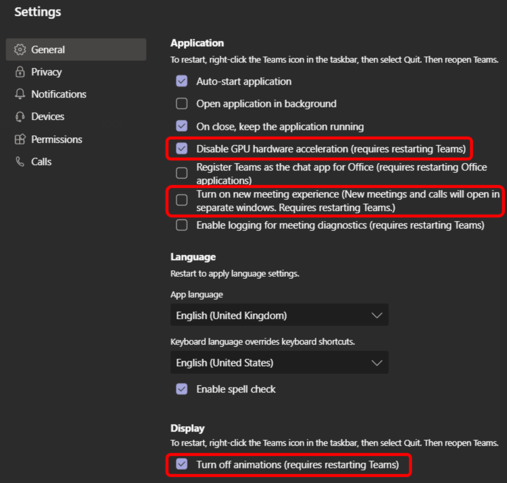
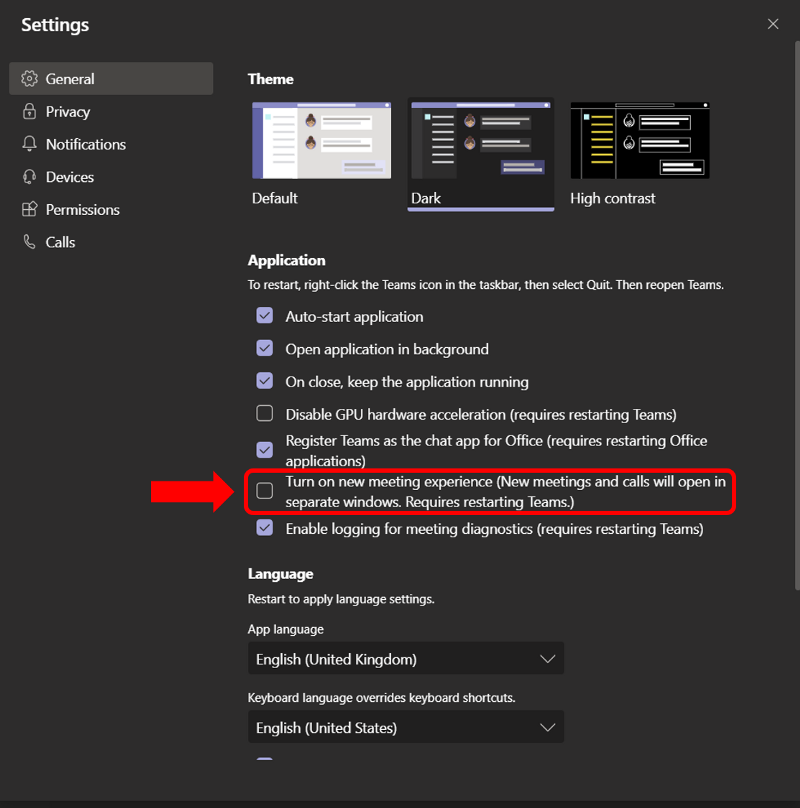
Step 2: Open your Teams desktop app → Select your display picture → Settings.
Important note: The meeting organizer can start a breakout room on the desktop client only.

Step 3: In the General tab, check (or enable) Turn on new meeting experience (New meetings and calls will open in separate windows. Requires restarting Teams.)
Step 4: To restart Teams, right-click the Teams icon on your taskbar (bottom right, next to your clock) → Quit → (Find and) Click your Microsoft Teams to restart.
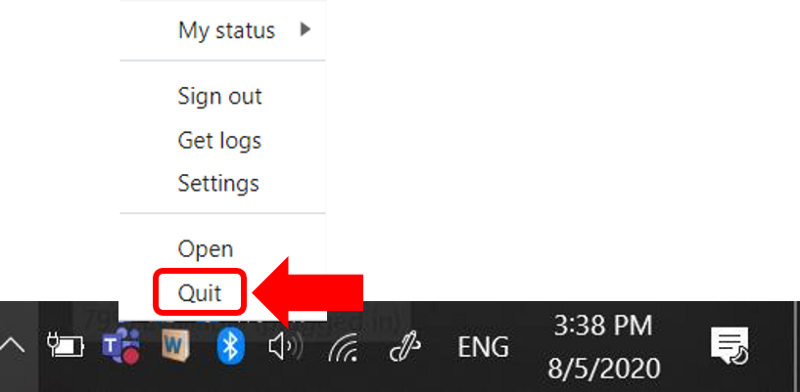
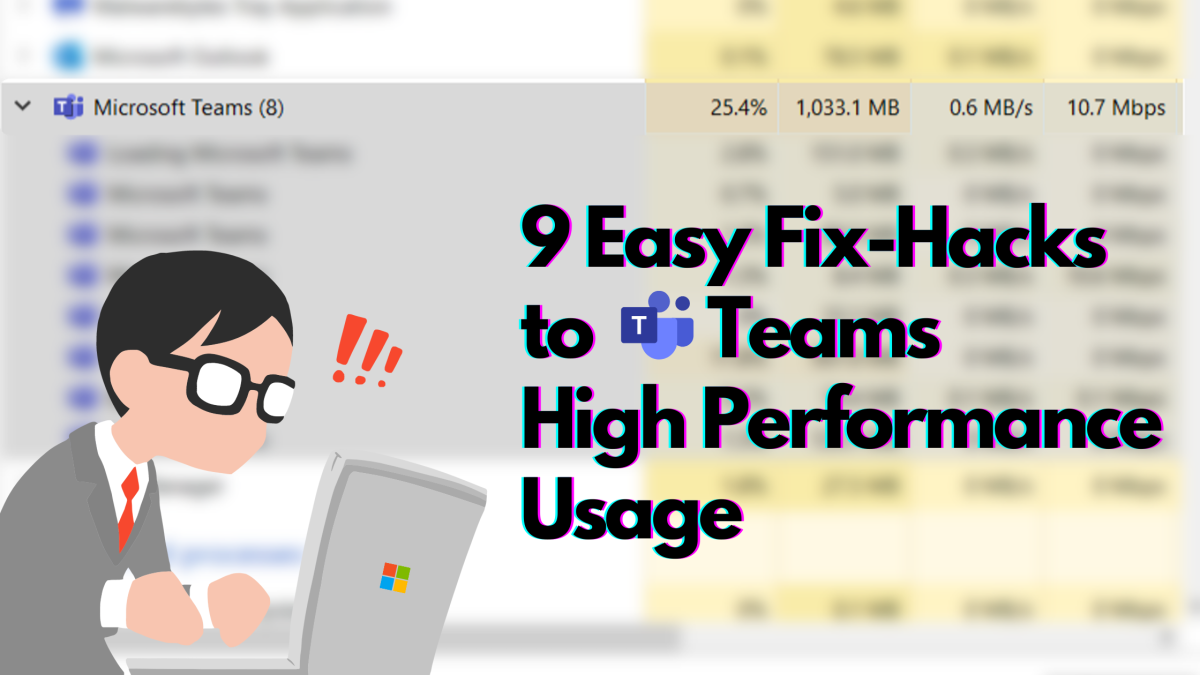
Important note: Your Microsoft Teams may experience high performance usage if your device has low memory (RAM), causing your laptop to lag or hang. If this happens, you will need to read this: 9 Easy Fix-Hacks to Teams High Performance Usage
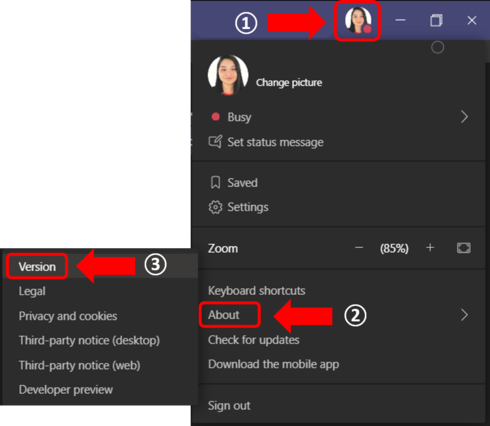
Step 5: Click your display picture → Check for updates.
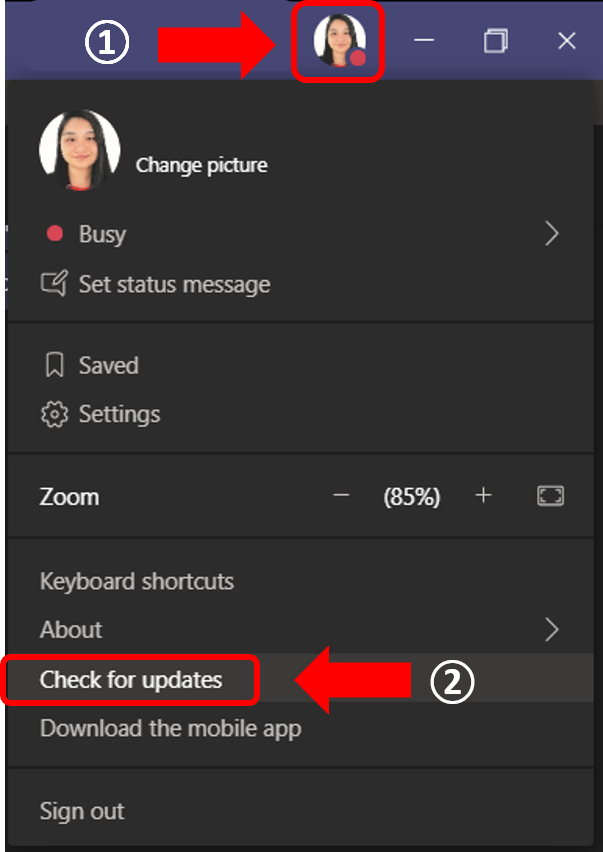
Step 6: Once updated, it will prompt you to restart your Teams, click Restart/Refresh or do Step 4.
Step 7: Click your display picture → About → [Check if you have] Public Preview.
Anecdote: This is the part where it may get a bit annoying (if you cannot wait like me). You may have to repeat Steps 5 to 7 several times until you get the Public Preview option.
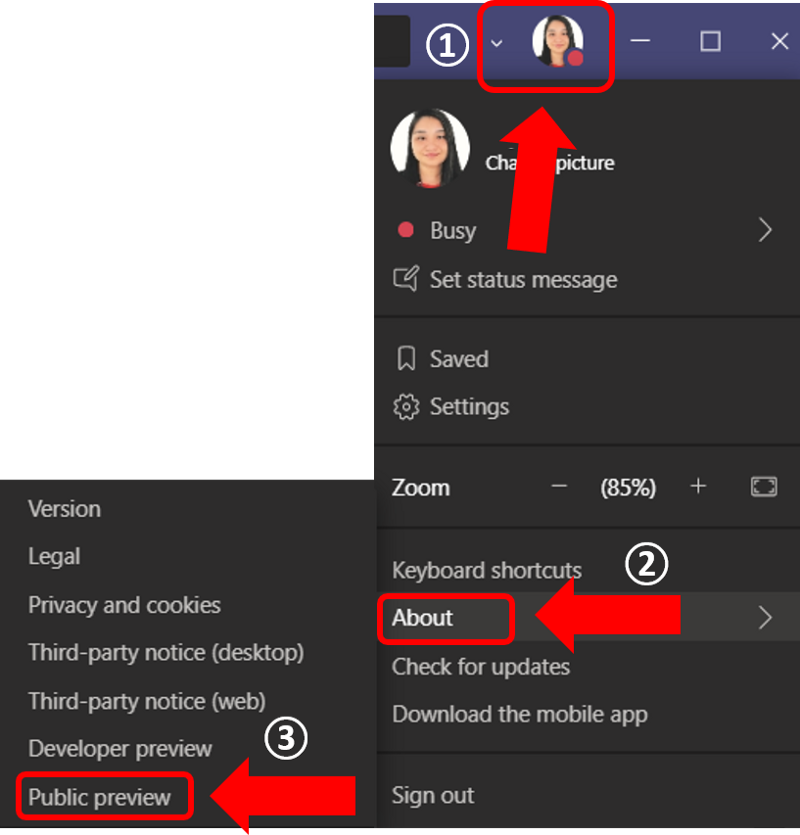
Step 8: When you select Public preview, you will be warned → Switch to public preview.
Warning!: You may start facing glitches once you switch to Public preview. Microsoft may not be able to support you as well since it is excluded from any support. Your IT support may not be able to support you as well.
Warning! Proceed at your own risk!

Step 9: It will prompt you to restart your Teams, click Restart/Refresh or do Step 4; OR it will automatically restart for you.
Step 10: Ta-dah! Now you have breakout rooms!
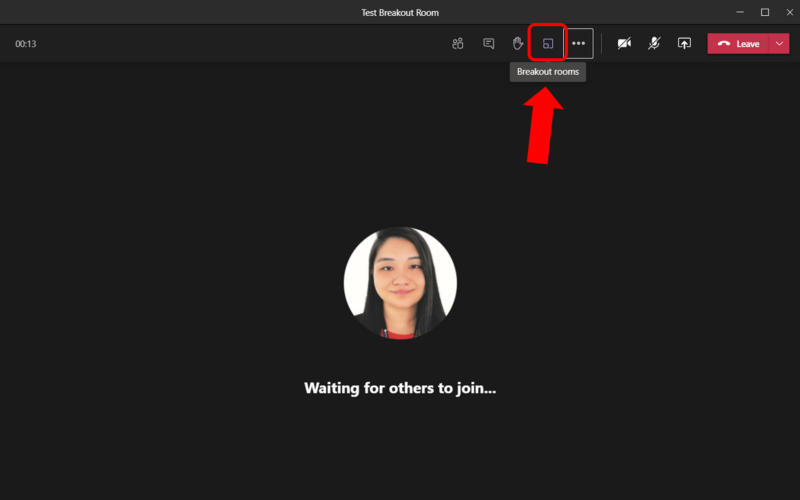
Step 11: Create a Teams meeting (either Teams Calendar [with External participants] or Teams Channel [for Internal participants] → Invite your participants → Join meeting
Reminder: The meeting organizer can start a breakout room on the desktop client only.
→ Click Breakout rooms → A prompt: Create Breakout Rooms (Preview) will appear → Choose the number of rooms you need → Select how you want to assign participants:
Automatically: Participants will be randomly assigned to different rooms (depending on the number of rooms you have selected).
Manually: You can select which participant to go into which room (if you need more control on the assignment).
→ Create Rooms
Tip: You can create up to 50 breakout rooms.

Opinion: It is going to be difficult to control them.
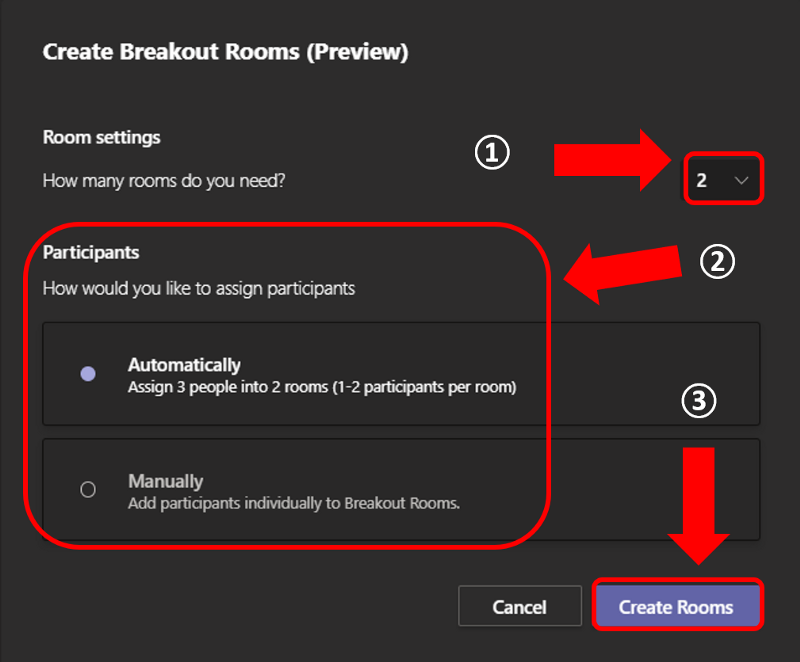
Anecdote: Having more control is the best to avoid any complications later.
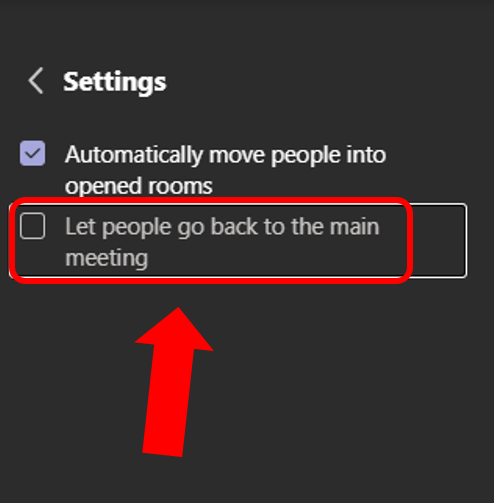
Step 12: You will need to wait a while for it to appear → Click More options (…) → Rooms settings.

Step 13: Check (or enable) Let people go back to the main meeting.
Tip/Opinion: If you do not check this, you will have a hard time getting people back to the main meeting room.
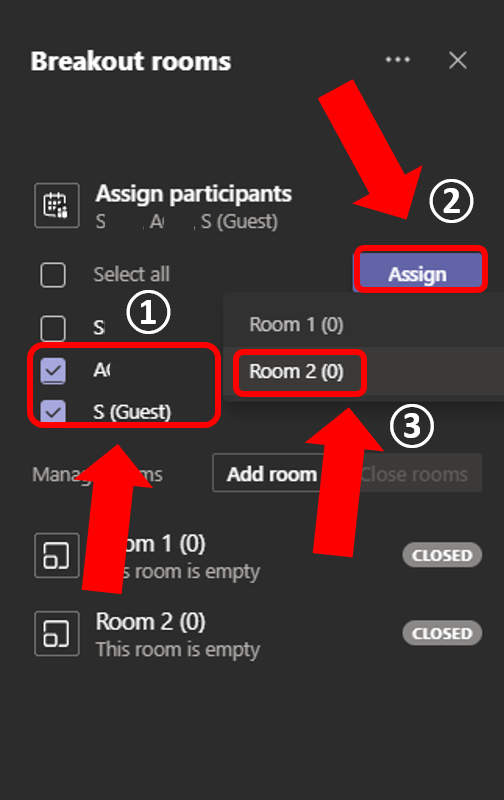
Step 14: Since you have chosen the number of rooms earlier, it will appear at the bottom → Choose which participants you want to go to which room → Assign → Pick the room.
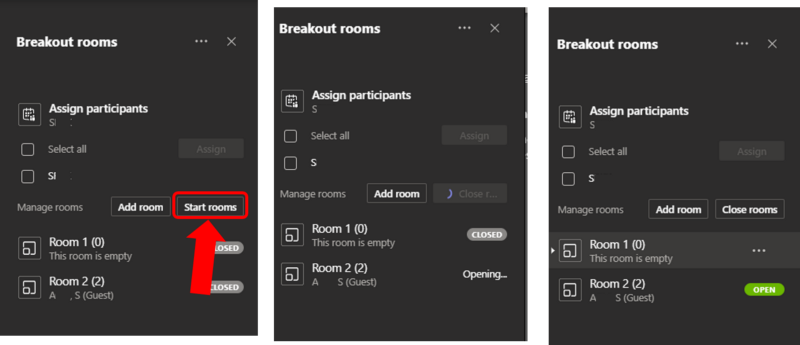
Step 15: Click Start rooms when you are ready to begin the breakout session
Note/Anecdote: It was initially closed so participants or attendees are not accidentally pushed into the rooms. When you Start rooms, it may take a while for your rooms to Open.
Step 16: [Participant’s POV] They will receive a prompt that they will be moved to the breakout room in 10 seconds and the Join room will appear for them to manually go to the rooms themselves.

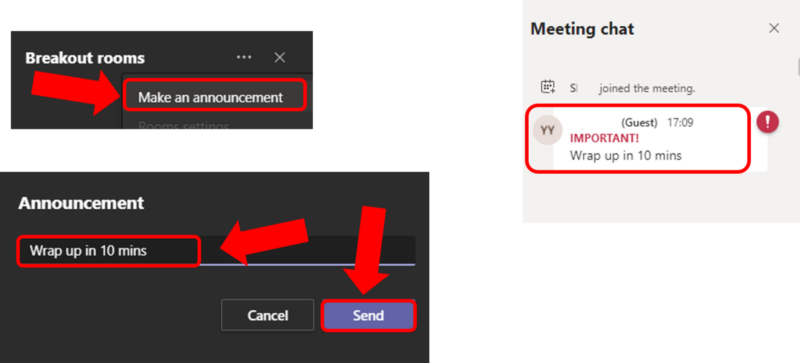
Step 17: When it is time to wrap up, click the More options (…) → Make an announcement → Type your announcement → Send.
Note: All rooms will receive the announcement.
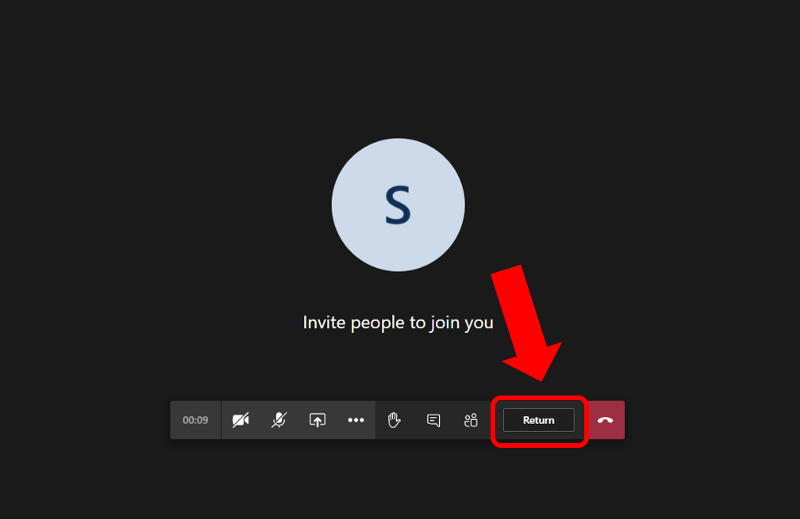
Step 18: [Participant’s POV] & [Organizer’s POV if you join the breakout room] Click Return.
Note: They will be pushed back to the main meeting.

Anecdotes:
1. If you do not do Step 13, your participants may not be able to see this. They will have to end the call and rejoin the main meeting through the Teams’ calendar or through the original meeting link.

2. If you have your meeting lobby set up, then the meeting lobby rules apply when your participants rejoin the main meeting.
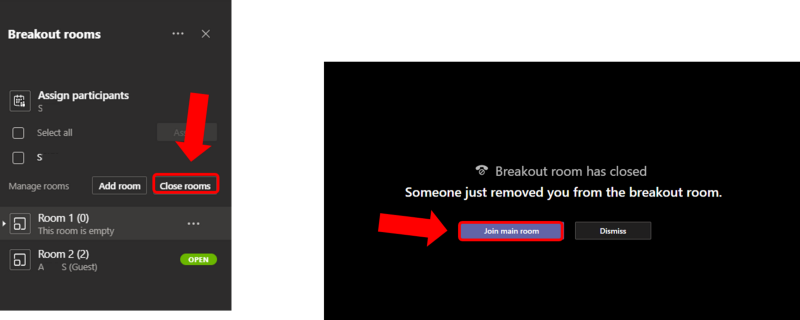
Step 19: If you want to make sure all participants leave their breakout rooms, click Close rooms. Participants will be prompted to Join main room.
Note/Anecdote: Again, it will take a while for the rooms to close and for participants to rejoin the main room.
Step 20: According to Microsoft, “Any files from the breakout rooms can be shared in the main meeting once everyone is back together and will be available afterwards in the meeting chat.”
Note: I could not test this out as I was using accounts from different tenants and as guests. Perhaps files shared via OneDrive link may work better compared to attachments. Or maybe this only applies to meetings done via Teams channel. Again, I could not test this out properly.
So, certain FAQs for you:
- Who can start a breakout room?
- Only the meeting organizer can start breakout rooms.
2. How can I use breakout rooms?
- The meeting organizer can start a breakout room on the desktop client only.
- Participants can join a breakout room from desktop, web or mobile. Microsoft Teams Rooms do not have breakout room capabilities yet.
- Participants logged in from multiple devices will have all end points join the same breakout room.
These 2 FAQs are from Microsoft Tech Community.
Final notes (& my take) of Teams Virtual Breakout Rooms (Preview):
- It is a cool and exciting feature! No doubt!
- Good for quick brainstorming sessions.
- For participants, you can enjoy this breakout room feature on your phones.
- If you can wait for this to be Generally available, there may be lesser glitches and more updates (But I cannot confirm when exactly will be the release date in Asia).
- It is going to be glitchy — Reminder: This is still a preview feature. Any glitch may not be supported by Microsoft or your IT support.
- It will be slow and even slower (if you have slow Internet and/or low memory [RAM]). Read this if your computer lags/hangs: 9 Easy Fix-Hacks to Teams High Performance Usage.
- I noticed that if you wish to reuse the same meeting link (which you actually can), and conduct another breakout session, your participants may not be automatically assigned to the breakout rooms (although you have closed and deleted the rooms, and created new rooms with the same name).
Workarounds:
1. Perhaps you can create new rooms with different names.
2. Just create a new meeting instead.
Let me know what you think! If you find this article useful, clap and reshare!